Please note that I will include a (hopefully complete) parts list at the end of this. Also, I am not sponsered by anyone nor do I recieve any rewards for any items I might link to. I found it. I bought it. I use it.
Preamble Ramble
Howdie!
This is a little DIY walk-through on installing a larger than stock aftermarket aluminium radiator in a Suzuki Samurai's stock radiator mounts.
For many years now I've been running an aluminum radiator that has been the popular choice with Samurai owners. This drop-in stock sized radiator was, and still is, available from multiple popular online Samurai parts suppliers for $200-$250 (as of Aug 2023). My 1.3L is mildly built: flat top pistons, cam, propane conversion (thus advanced timing thus more heat). Over the years my Sammy has gained a LOT of weight (33" wheels & spare, bumpers, winch, two propane tanks, diff gussets/armor, recovery gear, compressor, rack/tools, etc etc). My Sammy runs hot after a bit of driving, even on the street (hills). Definitely more so when offroading and/or when it's hot out. I had a 12" electric fan and on warm summer days I would manually turn it on and just keep it running. I quickly grew tired of the Samurai running hot. While she never boils over, she'll run a constant ~210°-215°, especially after a bit of offroading. Even with a 185° thermostat, that little stock sized radiator heats up and just doesn't have time to dissipate the heat before recycling the water back into the hot engine. I never really cared for the tiny radiator the Samurai has. So I started poking around for options and eventually found an aftermarket aluminium radiator that would drop right into the stock Samurai radiator mount without the need for fabricating custom mounts.
The radiator I found is considerably larger than my old stock-sized aluminium radiator, yet to does fit into the stock radiator mounts with very little effort (explained further below). I forget the capacity of the old stock 2-row radiator, it was under a gallon if I recall correctly. This new 3-row radiator holds more than 1.5 gallons. As well, this radiator is a bargin price-wise - $125. Hoses and other (optional) parts will cost more than the radiator itself, with the total (including all optional items) just over $400. It's a bit of cash, but not entirely that much more than the tiny 2-row aluminium radiator and new hoses. The gain in heat dissipation greatly outweighs the cost, in my opinion.
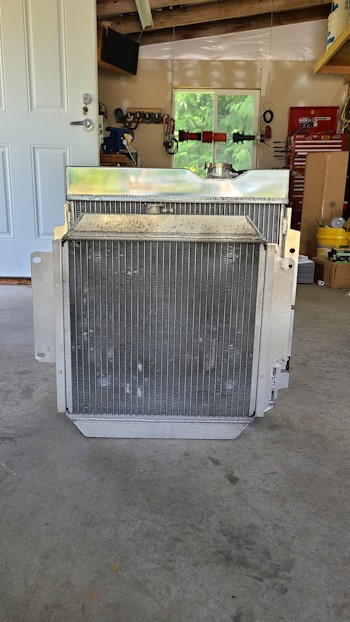
Yes, it fits into the same space as the stock radiator and uses the unmodified stock mounts!
Radiator Install top
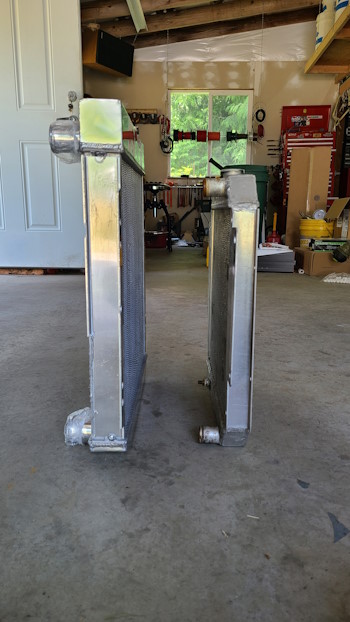
The radiator is taller than the stock radiator, so you need to get it mounted as deep (low) as possible so the hood will close.
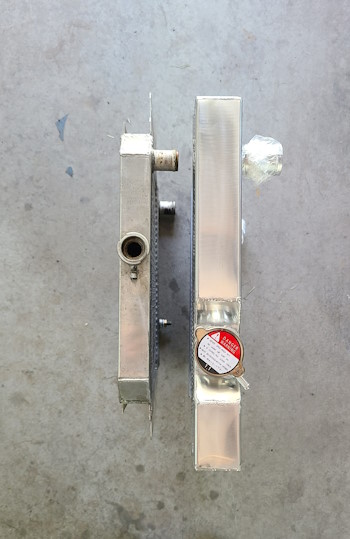
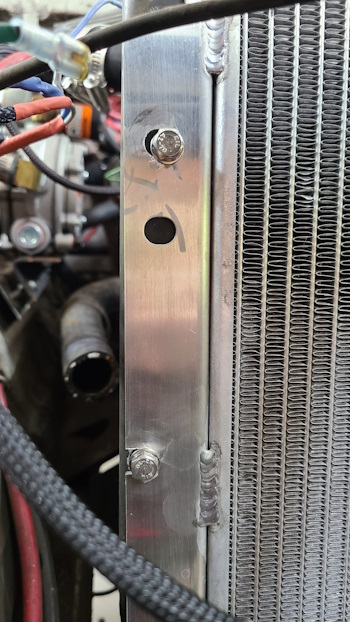
In order to slide onto the stock mounts AND fit deeply enough so that you can close the hood: a bit of the radiator's mounting plates need to be cut off (on both the left and right sides), or else it will bind up and/or be at an extreme angle when you try to slide it into place. The larger mounting plates (DON'T CUT) face the front of the vehicle, the smaller side (CUT THIS) faces the engine. The length of the cut needs to be long enough to drop the radiator as low as possible, but still clear any steering gear/dampener at the bottom of the radiator. Please note that I did not cut into the weld: leave enough of the weld and mounting plates so that they continue to securely hold the radiator! I removed approximitly 6-1/2" of the mount plate. This is not a fixed number, cut less, test fit, cut a bit more, test fit, ... until the radiator sits fully in the mount and nearly touches the dampener. Mine did touch the dampener, then I shimmed it so it was just above the dampener (see below)
I highly suggest taking your time and do a number of fit-tests. The whole process is pretty simple, but a little care goes a long way in reducing potential headaches.
Section that's cut out (both left and right sides of the radiator)
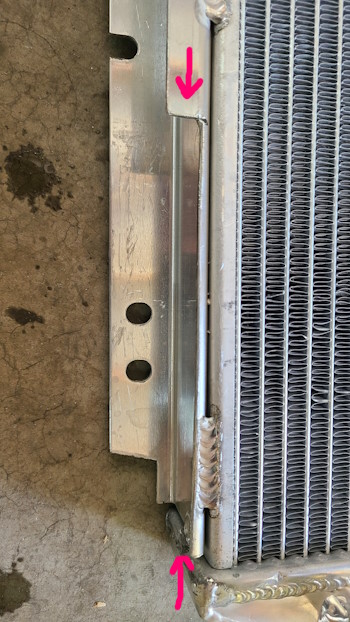
I have an OME dampener and it's a bit more girthy than the stock dampener. Regardless of your dampener type, you need to leave a little room between the dampener and the base of the radiator. I taped a ~1/4" makeshift shim to the dampener, and cut away at the radiator's mounting plates a few times until the radiator's base touched the shim on the dampener. Thus I ended up with about 1/4" of clearance between the radiator and the dampener.
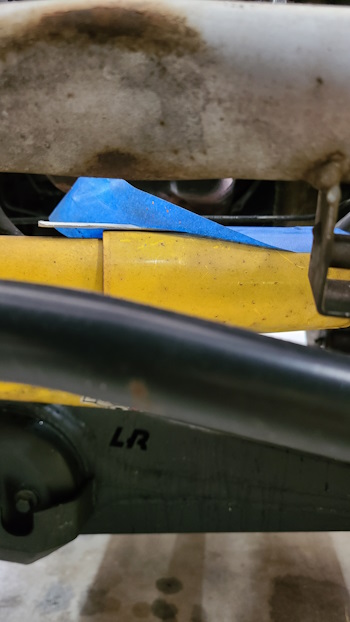
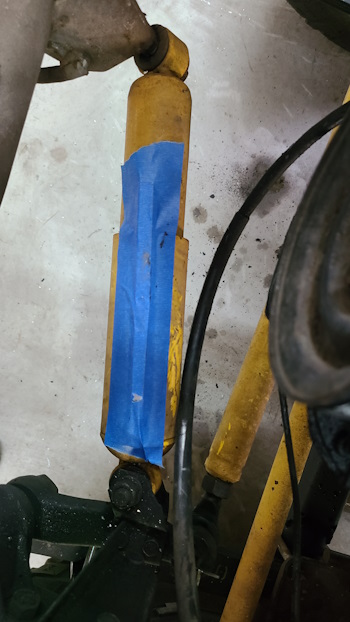
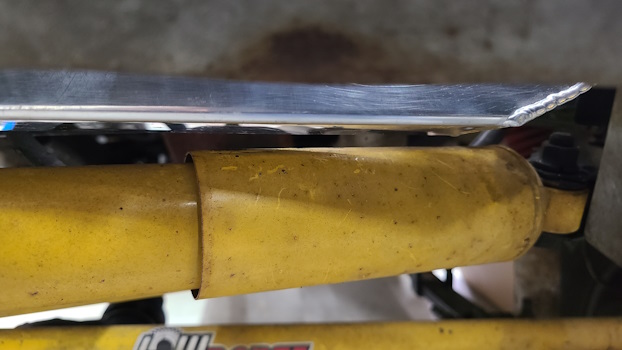
After completely mounted, I have a nice 1/4" or more of space between the dampener and the base of the radiator.
The height from the top edge of the radiator to the inside edge of the body by the hood latch, with a leveled square is exactly 3". I would not exceed 3", unless you plan to cut out/re-shape your hood so it will clear the radiator cap. 3" will require cutting the hood's interior reinforcement framing (see next section). Again, test fit and test fit some more!

The only "modifying" to the stock mounts will be to drill 4 holes for bolting the radiator to the stock mount. I did not need to drill the radiator's mount plates - I used the holes already in it. With the radiator in the mount, and resting on the shims on the dampener: I marked the hole locations, removed the radiator, drilled the holes, then I installed rivnuts on the stock mounts. Rivnuts aren't required - using standard nuts and bolts would be more than fine. (I used bigger washers once everything was all fitted up, fasteners in the pictures were just temporary).
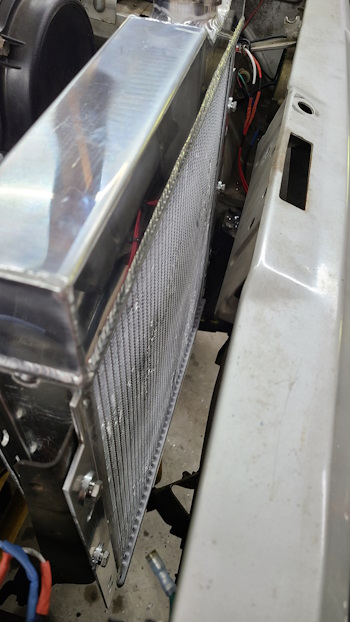
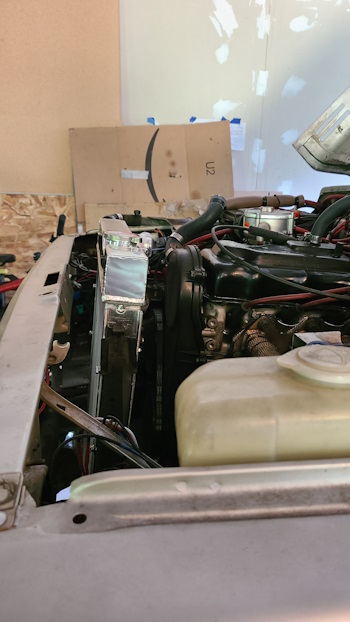
The new radiator fits in nicely, albeit with a bit of rear-ward angle, when attached to the stock mounts. It does fit higher than the stock radiator. Thus, the next procedure, to clear the radiator cap, arises.
Hood/Radiator Cap Clearance top
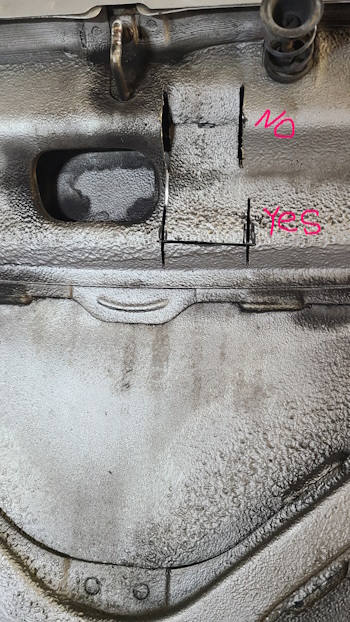
The hood won't completely close because the radiator cap/filler neck just barely hits the underside of the hood. Take your time eyeballing where it's hitting, and cut away at the inside of the hood. I cut a rough "H" pattern, then bent the lips of the cuts flat. One of these days I'll weld it up a little... one of these days.
Don't make the mistake I did -- I eyeballed it the night before, but cut it the next day and ended up cutting the hood in the wrong spot. So, I ended up having to cut twice. Basically the cut is on the smaller curved interior reinforcement crossmember. My mistaken cut was on the larger curved crossmember. :p
corrective measures = success! :p
Pretty much that's it for the install, really not hard at all. Be careful of the radiator fins, they bend EASILY (I gently opened up bent fins with a tiny screwdriver).
Drainage top
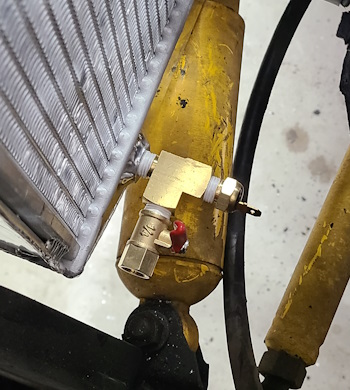
The drain plug that comes with the radiator is pretty cheap (plastic). Regardless of your solution, I do suggest at least a brass plug (thread is 1/4" NPT). I did gently tap/chase the threads in the radiator, but I doubt that it's necessary to do so. I just wanted a wee bit more bite. I installed a 1/4" NPT T-fitting (one Male, 2 Female - see parts list) on the drain hole. So I could install both a thermo-switch and a drain valve. I zip-tied the ball valve's lever to help to make sure it doesn't get bumped/vibrate open. When I drain the radiator, I temporarily screw a 90° elbow into the ball valve plus a a ~4-6" nipple and attach a short length of hose to that - then I don't make a mess on my shop floor. I admit, it drains a little slowly, but there is no mess.
Hoses in General top
Things get a little wonky with hoses. The new radiator won't work with the stock hoses, so some mucking around is required to route hoses into and out of this deeper, taller, wider radiator - that also has larger input (1-1/2") and output (1-3/4") pipes than the stock Samurai has (1-1/8").
Unfortunately, you will probably spend about the same amount of money on hoses as you will on the radiator. Perhaps you know of, or can find, a less expensive alternative. Thankfully the radiator itself is a bargin.
...
Output Hoses top
The radiator's output pipe is 1-3/4", so you need a reducer to mate up to the Samurai's 1-1/8" hoses. The parts list below will help get you going, and/or you can search for your own solution. The hoses were not cheap, cut with care!.
The hose "roadmap":
Radiator Output Pipe ⇄ 1-3/4 to 1-1/8" Reducer ⇄ 1-1/8" Aluminum Hose Joiner ⇄ 1-1/8" 90° elbow ⇄ stock Samurai 90° metal pipe/stock hose.
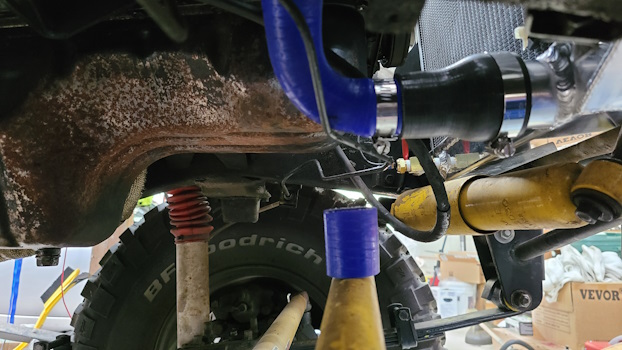
The Lower Hoses: the stock 1-1/8" horizontal (rubber) hose that feeds to the water pump is retained and used, but will need to be shortened a tad. The stock vertical 90°/straight metal pipe will be retained and used.
- Install the 1-3/4" to 1-1/8" Hose Reducer on the radiator's lower output pipe.
- Install the 1-1/8" Aluminium Hose Joiner
- Install the 1-1/8" 90° hose, trim the end that goes onto the Aluminum Pipe Joiner as short as possible, so the joiner's tip just meets up to the start of the 90° bend.
- Install the stock metal pipe into the 1-1/8" hose.
- Trim the stock horizontal hose to length and attach to the metal pipe.
Trim as needed: Test fit, test fit, test fit, then cut! Don't forget hose clamps! :p
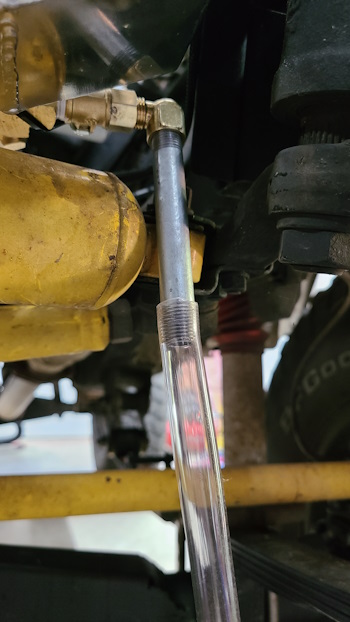
The 90° hose will need to be trimmed at the end that goes into the reducer, so that turns upward quickly. You can see the peice that I cut off in the two pictures below.
The long *stock* horizontal 1-1/8" hose (that ends up feeding into the waterpump) will need to be trimmed back some. (just barely visible in the pictures below - at the 90° bend of the metal pipe)
Note that I have the stock metal pipe "secured" with a sturdy zip-tie. I'll be welding in a small mount point for this vertical stock metal pipe, but I don't think a hard-mount is an absolute necessity. Zip tie, heavy wire, etc is probably good enough. I mostly just don't want it to vibrate against the alternator.
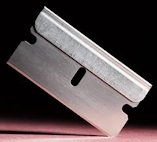
Overall, hose routing should be pretty simple to accomplish, but do some mock-ups before cutting, hoses aren't cheap! A sharp single edge thin razor blade, held with just your fingers, slices hoses easily and cleanly and spares the need to remove the horizontal running stock hose - you can cut it in place.
Input Hoses top
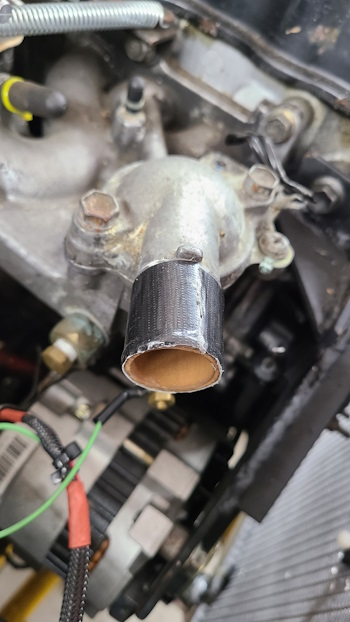
The radiator's input pipe is 1-1/2", so this was my solution to stepping up the hose size from the 1-1/8" thermostat housing.
The hose "roadmap":
Radiator Input Pipe ⇄ 1-1/2" 135° Elbow ⇄ 1-1/2" Aluminum Hose Joiner ⇄ 1-1/2" 180° Elbow ⇄ 38mm Radiator Temperature Joint Pipe OR 1-1/2" Aluminum Hose Joiner ⇄ 1-1/2" to 1-1/8" Reducer
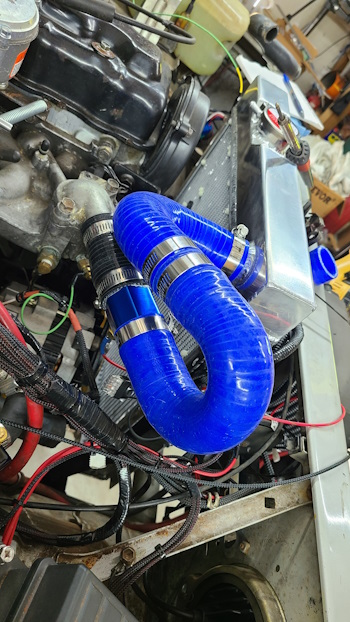
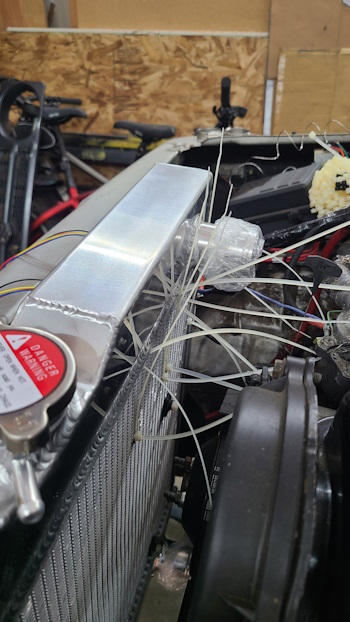
The Upper Hoses: The entire hose run from the thermostat housing to top of the radiator will have to be replaced/re-engineered (aka "gid 'er dun"). Maybe you can figure out a better solution, but this is how I worked it out. The stock hose is not used.
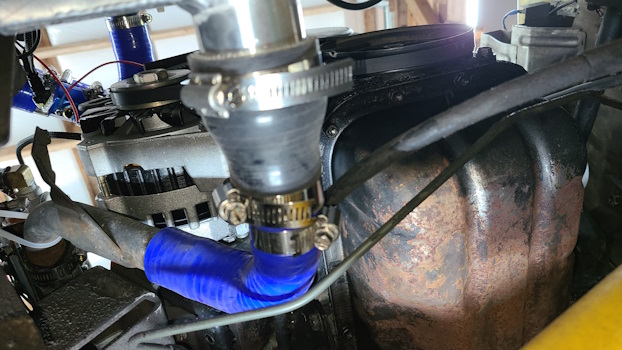
- Install the 1-1/2" 135° Elbow on the radiator's upper input pipe. Rotate it so it's pointing about 10° up, and facing out towards the passenger side.
- Install the 1-1/2" Aluminium Hose Joiner.
- Install the 180° Elbow so it's vertical (looping down and towards the thermostat housing).
- Install the 1-1/2" Radiator Temperature Joint Pipe OR a 1-1/2" Aluminium Hose Joiner.
- Install the 1-1/2" to 1-1/8" Hose Reducer.
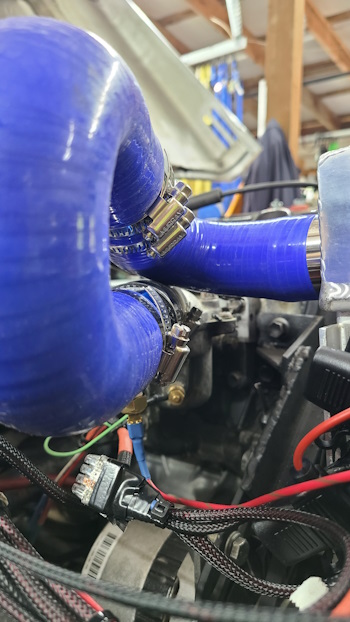
- With everything clamped up, except the 135° hose at the radiator pipe - gently rotate the 135° hose and push down on the mass of hoses so that the 135° hose is at the same height as the radiator (to try to avoid trapped air). When filling the radiator I push down on the hoses a little to let any trapped air in the hoses escape into the radiator's tank. The goal is to try and get the 135° hose to sit almost exactly at the same height as the radiator's tank, but without any extreme twisting pressure or smashed hoses. Mine ended up just a hair higher than the radiator.
Trim as needed: Test fit, test fit, test fit, then cut! Don't forget hose clamps! :p
The first picture was before I twisted the 135° hose. The third picture is after twisting the 135° hose so it's even with the top of the radiator, but without undue stress on the hoses.
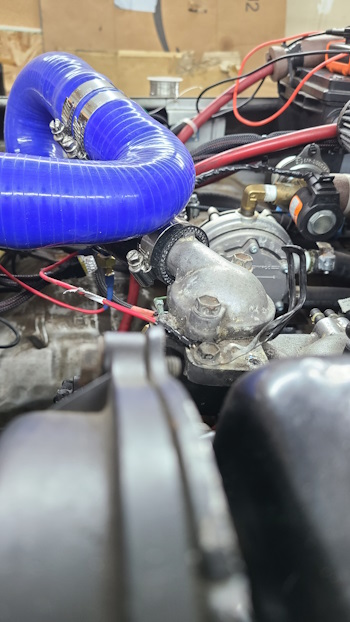
The 1-1/8" to 1-1/2" reducer hose I bought fit a little loosely on the thermostat housing. I wrapped one layer of Gorilla tape (or gaffers tape) around the pipe and the seal is holding more than fine. As well, the Radiator Temperature Joint Pipe also needed a layer of gaffers tape on it.
No tape was needed on the Aluminum Hose Joiners nor on the radiator's input/output pipes.
General Fan Craziness top
An electric fan is a must. A clutched fan (aka stock fan) will not work as there will not be enough space between the radiator and the engine/pulleys.
This is by no means a necessary part of the install. This is just my oddball fan setup. Maybe you'll like it, maybe not.
I went a little crazy with my fan configuration. I already had a 12" electric fan, it moves a good amount of air - but it really sucks power. When it powers on there is a very noticable hit on the engine (the alternator kicks fully on, that little 1.3L engine definitely doesn't need more horsepower not going to the wheels). While I want the big fan for mass cooling, I wanted something more friendly on power suckage. Something that won't trigger the alternator. Something that allows leaving the fans on when the engine's off without worrying about sucking the batteries dry. My solution: computer fans! Four 12v 1amp computer fans.
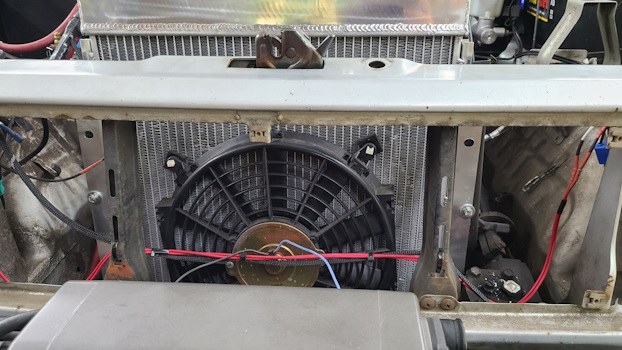
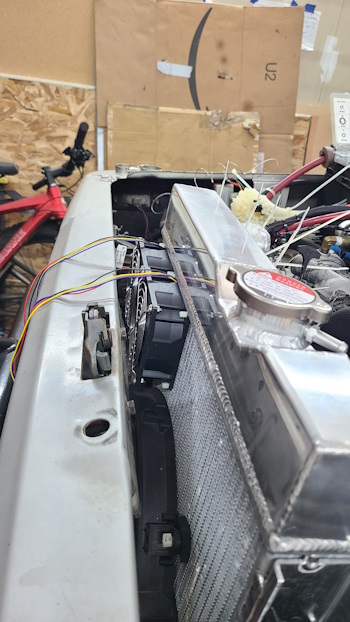
Also, I wanted to dissipate heat from the top of the radiator first, via the low consumption computer fans. Then run the main fan on the lower end of the radiator only when it's needed. I mounted a row of four computer fans along the top of the radiator, and the main fan is under those fans.
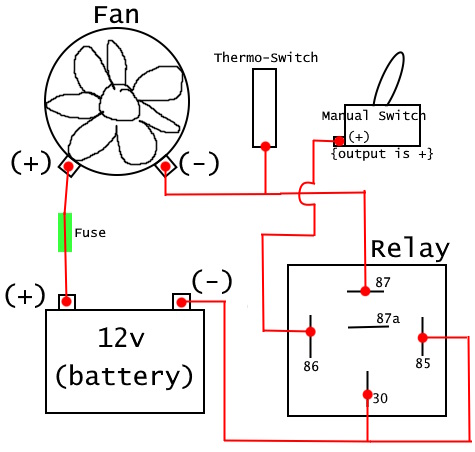
To trigger the fans on (automatic activation) I used two 170° ON/155° OFF thermo-switches. (Thermo-switches create a ground when activated, so basically the fans are always "live"; meaning that there's a constant 12v Positve supply to them. Because they're not grounded they're "off" by default. One Thermo-switch, to the computer fans, is just outside the thermostat (so it triggers off the HOT output from the engine as it flows into the radiator). The other Thermo-switch is at the radiator's drain and will ground the main fan. Also, manual switches in the dash allow me to force the fan(s) on whenever I want - including when the engine is off. I use the relays to establish a ground.
Main Fan Install top
The mode of installation might vary depending on what fan(s) you're using.
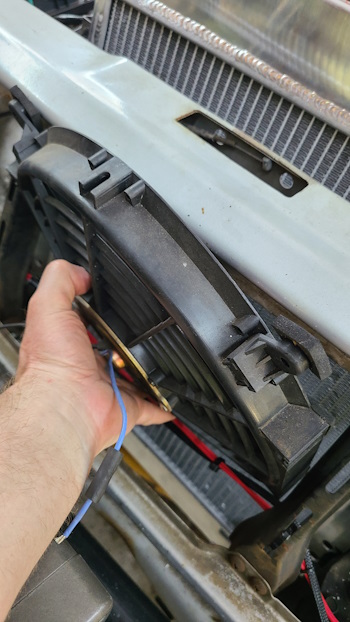
Remove the grill from the front of your Samurai, and detach the hood latch mechanism/cable, if you haven't already. My main fan is 12" blade (slightly larger body) and slid pretty easily from the front of the grill onto the radiator. Use care not to bend the cooling fins on the radiator. How your fan attaches might be different. Mine goes on with zip-ties and little feet to clamp the fan to the radiator. One of these days I'll fab up a fan shroud to cover the entire radiator. ...one of these days
Note: I set up my fan to be a pusher. This required that I flip the fan blade, and reverse the polarity (aka the fan runs backwards). Your fan may or may not require flipping, but probably requires reversing the polarity if you make it a pusher.
Computer Fan Install top
The computer fans are mounted with zipties and small washers. Two fans are in a row from the Top Left of the radiator. The other two are from the Top Right. I had the wires come out at the top. I only need the power and ground wires, so I cut off the other two unused wires and the 4-pin connector.
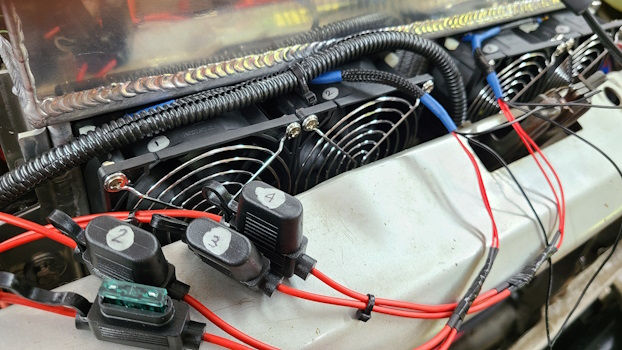
The computer fans and the main fan do not share their positive and negative wiring feeds. All computer fans share a common ground (which is activated either by the thermo-switch, or relay via a manual switch). All the computer fans share the same positive source, but split into separate wires with each having its own inline fuse holder (with 1amp fuses). I ended up stuffing the inline fuse holders along the passenger side of the radiator's mounting plates.
Note that the computer fans have a Flow Direction indicator imprinted on the fan body.
"Soon" I'll wire in a fan speed controller (is on order, so no pics yet). Using a controller will allow me to run the fan(s) at a lower draw/slower speed to save on battery drain and to reduce fan noise. There's plenty of options for this - I chose one with a built in display and more importantly it'll handle up to 30 amps, so I can use this for any fan without worrying about melting those fine Chicom electrical parts and/or starting a fire. I'll be running this on the computer fans - as I want the main fan to run at 100% power, because if it's on means it needs to be on.
Basically: 12v(+) ⇒ Fan Speed Controller ⇒ Fan(s)

Fan Wiring top
The wiring is pretty simple, but I know that relays can be confusing if you haven't wired some up before. Plenty of how-to's on that are online. You can use either a four or five post relay. If using five post relays, "87a" is unused and can be ignored. This relay setup is working as a triggered GROUND. By default it is NOT grounded. When you manually activate the relay, via a button/switch, it triggers ON the ground and thus the "live wired" fan, now grounded, will start running. The thermo-switch will automatically establish a ground when temps raise up enough for the thermo-switch to trigger.
Don't overlook putting in a fuse to the hardwired fan's positive wire. On my build I have each computer fan wired with its own 1amp fuse, and my main fan has its own 15amp inline fuse.
I am running two wiring setups that are identical, but separate. One runs the computer fans, the other runs the main fan. Two switches, two thermo-switches, two relays, two separate positive power sources, and two separate grounds (see wiring "schematic" below). Reason for two systems: I want the computer fans and main fans to function independantly - both when automatically triggered on via thermo-switches and when triggered on manually via the dashboard switches.
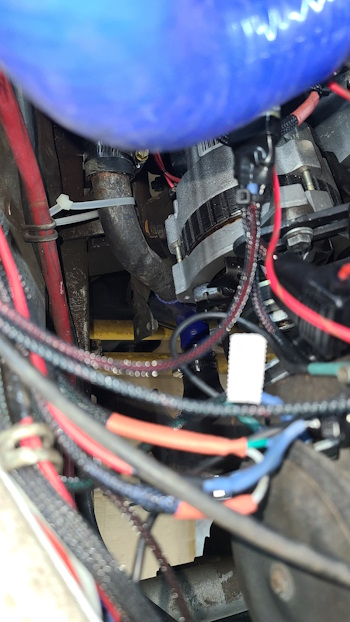
Note that the thermo-switch needs to be GROUNDED when it's active. The lower thermo-switch will be grounded if you have it screwed into the radiator/T-Fitting. But if, for some odd reason, you have the thermo-switch screwed into a non-conductive fitting you'll have to make a ground somehow.
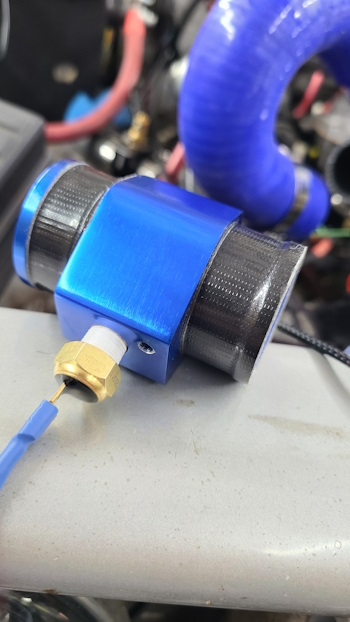
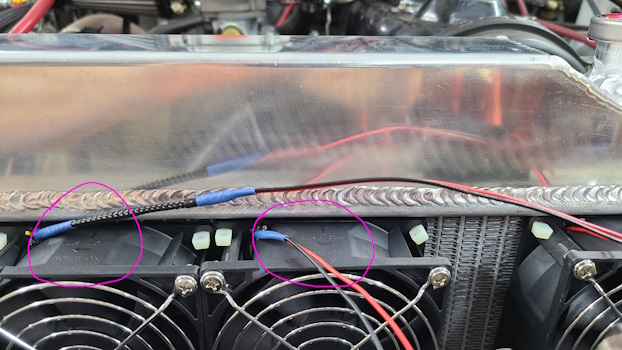
The upper thermo-switch, which is mounted in the "Radiator Temperature Joint" right outside the thermostat housing is NOT grounded. Thus use a Temperature Joint that has a grounding screw in it, or craft one yourself. While radiator fluid will *probably* create a ground, but that is a very bad and unreliable solution.
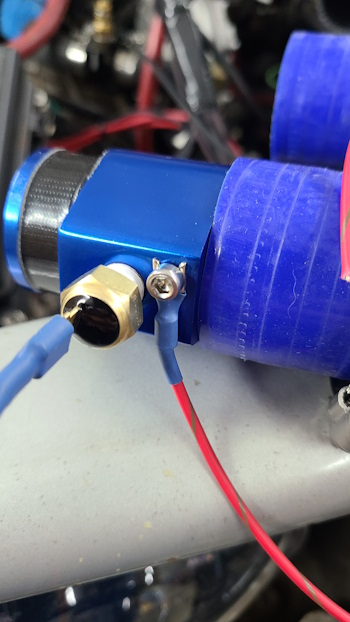
Red wire, in the picture above, is grounded to the engine/chassis. So when the thermo-switch activates, it will be grounded. If I didn't have that wire, there would be no ground, as the "Temperature Joint Pipe" is isolated from a ground.
Dip Stick top
The new hoses may or may not interfere with the dipstick. It definitely did for me. I cut off the T-handle and some of the blade, leaving about 1-1/2" sticking up from the dipstick tube/seal. I'll tack weld the T-handle back onto the blade, at an angle. However, it's very easy to pull out the cutoff dipstick without the T-handle so welding it is not a requirement.
Final Mutterings top
While idling in my shop for over 20 minutes, I let her heat up to ~215°, cooled her down to ~185°, then let her heat up to ~215° again. Then activated all fans, and 1:38 (min:sec) she stayed steady at 185° (which is what my thermostat is, a 185°). While idle (not moving) the computer fans alone seem to slow the build-up of heat -- but not fully avoid overheating. Eventually the main fan is needed. Again, at a stand-still idle inside my shop. I have much better heat control on the road, naturally.
Parts List top
Prices are what I paid at the time I purchased the item(s) (July 2023), rounded to nearest dollar.
The only "REQUIRED" part is the radiator itself. I'm also listing a "Pretty Much Required" list of parts, that being hoses - as these are pretty much essential. You of course can figure out and source your own hose solutions - so the hoses I list are not absolutes. Keep in mind that the stock Samurai hoses will not work. Again, the stock Samurai Clutch-Fan cannot be used.
I did not list a (main) fan in the parts lists, as I didn't purchase one (already had it). Expect to pay $20-$100+ for an electric fan. Try not to go too cheap - or carry a spare, cuz it'll suck nuts when your fan dies and you're miles out on a trail and you end up stopping every 10 minutes to cool down for 30 minutes. Think I paid around $70+ for my 12" fan (from Jegs or Summit) 15+ years ago, and it's been running flawlessly.
Required:
Note that the radiator is offered in a varity of sizes, the size that fits perfectly into the stock Samurai mounts is listed below!
1x 1960-1966 Ford Falcon/Comet/Mustang V8 Radiator >>> Core Size: 16.375"x17.25"x2.25" <<< - $125 (Amazon)
Total for "Required" parts: $125
Pretty Much Required:
Prior to discovering Pegasus Auto Racing, I bought 2 hose reducers off Amazon. Pegasus sells similar, but I have no regrets with my Amazon purchase, they seem high quality.
1x 1.75" to 1.125" Reducer $4 (Amazon) (Great price - was probably underpriced by the seller by mistake.)
1x 1.5" to 1.125" Reducer $17ea (Amazon) (for the money, I'd just get one from Pegasus)
Pegasus Auto Racing Pegasus's website, used for the following items (search for the given part numbers)...
1x 1-1/2" I.D. 135 degree elbow, 4" legs -- Part No: E135 38 BLUE - $28
1x 1-1/2" I.D. 180 degree elbow 4" legs -- Part No: E180 38 BLUE - $31
1x 1-1/8" I.D. 90 degree elbow 4" legs -- Part No: E90 28 BLUE - $16
1x 28mm (1-1/8") Aluminum Hose Joiner -- Part No: HJ28 - $8
2x 38mm (1-1/2") Aluminum Hose Joiner -- Part No: HJ38 - $11 ONLY ORDER ONE *IF* you get the optional Temperature Joint Pipe (see below).
Please note that Pegasus offers other hose colors, the part numbers I listed are for the blue hoses.
Total for "Pretty Much Required" parts: $115
Optional:
1x 38mm (1-1/2") Radiator Temperature Joint Pipe - $8 If you don't buy this item, then buy *TWO* Pegasus HJ38's (see above).
1x 1/8" NPT, 170° ON/155° OFF, Thermostat Switch $22
1x 1/4" NPT, 170° ON/155° OFF, Thermostat Switch $20
1x 1/4" NPT Ball Valve $8
1x 1/4" NPT T-Fitting $15 (pack of 4, I bought these a while back, but I like that the straight section is longer than many other T-fittings - that extra depth is needed for the temperature switch.)
1x 1/4" Male, 1/4" Female NPT, Ball Valve $8
1x 1/4 NPT Male, 1/4" NPT Female, 90° Elbow. ~$4 (linked item is just an example. I had a few laying).
1x 1/4" Male NPT, 6" Nipple ~$8 (like the elbow immediately above, I had some laying around. Link is just an example.)
4x 92mm x 38mm Computer Fan These are 1amp fans - other fans I looked at were 1.5+ amps). I'm pleasantly surpised that these do push a good amount of air. Like our government, they're crafted by Chicom so who knows how long they'll last. $64 ($16ea)
1x Fan Speed Controller $10
2x 5-Post Relay (Pack of 10) $3. (ACTUAL price is $15 for a 10pack. At $1.50 each, this pack of ten is way better than buying a couple singles at ~$5 each. Relays are always handy to have laying around so you'll use um eventually.
2x Switches. No link, there's tons of options, but you should be able to get a couple of decent switches for ~$10.
Total for "Optional" parts: $180
Grand Total: $420 As of Aug '23.